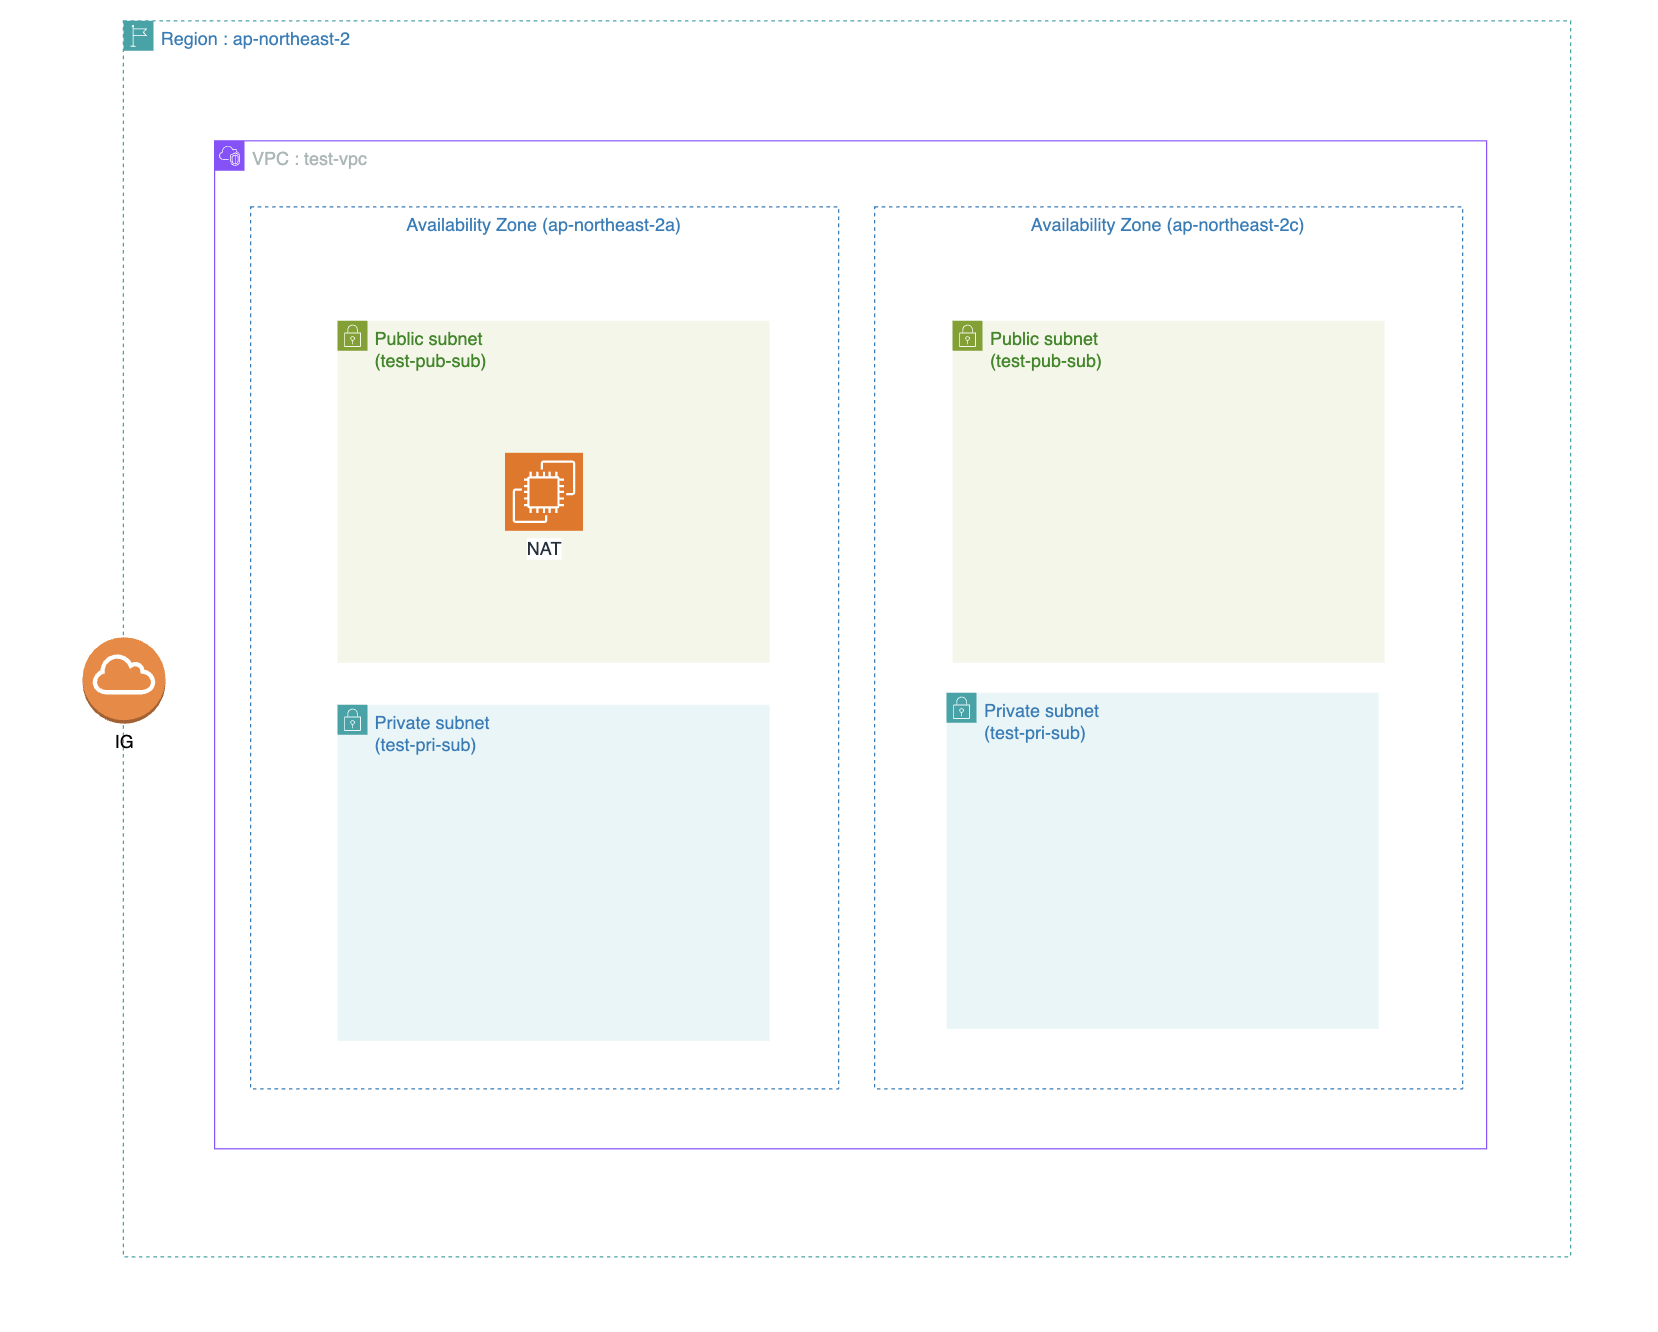
오늘은 Terraform을 이용해서 서비스를 배포하기 위한 환경을 세팅해보고자 합니다!
먼저 그냥 AWS Console에서도 생성이 가능하지만 테라폼으로 코드로 구현하는 이유를 말씀드리겠습니다
저 또한 맨날 AWS 홈페이지 접속해서 마우스로 클릭하면서 VPC와 EC2를 생성했었는데요, 새로운 프로젝트를 진행할 때마다 같은 구성을 반복하면서 생성하고 있었어요. 번거롭고 귀찮았었죠,, 그리고 휴먼에러 가 제일 많이 발생했습니다..
이러한 단점들을 보완하고자 코드형 인프라 (Infrastructure as Code) 로 관리를해여 클라우드 환경을 관리하고자 합니다!
그래서 오늘은 가장 기초적인 VPC와 IGW, NAT, 라우팅테이블 등 기본 세팅을 Terraform으로 세팅하는 것을 포스팅하려고합니다!
아래와 같은 구성으로 진행하려합니다.

디렉토리 구조
terraform/
├── modules/
│   └── vpc/
│       ├── main.tf
│       ├── variables.tf
│       └── outputs.tf
├── env/
│   └── dev/
│       ├── main.tf
│       ├── variables.tf
│       └── terraform.tfvars
└── provider.tf
provider.tf
리전 설정을 해줍니다.
provider "aws" {
  region = "ap-northeast-2"  # 서울 리전
}
modules/vpc/main.tf
주석과 같이 VPC, IGW, NAT, Subnet과 Routing Table을 설정해줍니다.
# VPC 설정
resource "aws_vpc" "main" {
  cidr_block = var.vpc_cidr
  enable_dns_support = true
  enable_dns_hostnames = true
  tags = {
    Name = "test-vpc"
  }
}

# Internet-Gateway 설정
resource "aws_internet_gateway" "igw" {
  vpc_id = aws_vpc.main.id
  tags = {
    Name = "test-igw"
  }
}

# NAT-Gateway 설정
resource "aws_nat_gateway" "nat" {
  allocation_id = aws_eip.nat.id
  subnet_id     = aws_subnet.public[0].id
  tags = {
    Name = "test-nat"
  }
}

# Elastic IP (탄력적 IP 설정)
resource "aws_eip" "nat" {
  vpc = true
}

# Public Subnet 설정
resource "aws_subnet" "public" {
  count                   = length(var.public_subnet_cidrs)
  vpc_id                  = aws_vpc.main.id
  cidr_block              = var.public_subnet_cidrs[count.index]
  map_public_ip_on_launch = true
  availability_zone       = element(var.azs, count.index)
  tags = {
    Name = "test-pub-sub"
  }
}

# Private Subnet 설정
resource "aws_subnet" "private" {
  count             = length(var.private_subnet_cidrs)
  vpc_id            = aws_vpc.main.id
  cidr_block        = var.private_subnet_cidrs[count.index]
  availability_zone = element(var.azs, count.index)
  tags = {
    Name = "test-pri-sub"
  }
}

# 인터넷 게이트웨이용 라우팅 테이블 생성
resource "aws_route_table" "public" {
  vpc_id = aws_vpc.main.id

  route {
    cidr_block = "0.0.0.0/0"
    gateway_id = aws_internet_gateway.igw.id
  }

  tags = {
    Name = "test-pub-rtb"
  }
}

# IGW에 라우팅 테이블 적용
resource "aws_route_table_association" "public" {
  count          = length(var.public_subnet_cidrs)
  subnet_id      = aws_subnet.public[count.index].id
  route_table_id = aws_route_table.public.id
}

# NAT 게이트웨이용 라우팅 테이블 생성
resource "aws_route_table" "private" {
  vpc_id = aws_vpc.main.id

  route {
    cidr_block     = "0.0.0.0/0"
    nat_gateway_id = aws_nat_gateway.nat.id
  }

  tags = {
    Name = "test-pri-rtb"
  }
}

# NAT에 라우팅 테이블 적용
resource "aws_route_table_association" "private" {
  count          = length(var.private_subnet_cidrs)
  subnet_id      = aws_subnet.private[count.index].id
  route_table_id = aws_route_table.private.id
}
modules/vpc/variables.tf
위에서 주입한 변수들은 해당 파일에서 가져올거라고 명시해줍니다. (재사용 가능)
variable "vpc_cidr" {}
variable "public_subnet_cidrs" {
  type = list(string)
}
variable "private_subnet_cidrs" {
  type = list(string)
}
variable "azs" {
  type = list(string)
}
modules/vpc/outputs.tf
만들어진 리소스들을 외부에서 참조 가능하도록 출력
output "vpc_id" {
  value = aws_vpc.main.id
}

output "public_subnet_ids" {
  value = aws_subnet.public[*].id
}

output "private_subnet_ids" {
  value = aws_subnet.private[*].id
}
env/dev/main.tf
아까 만든 vpc를 불러와줍니다. 이때 변수 할당은 envs/dev/variables.tf 에서 가져옵니다. 그리고 추가로 보안그룹들을 추가해줍니다.
module "vpc" {
  source               = "../../modules/vpc"
  vpc_cidr             = var.vpc_cidr
  public_subnet_cidrs  = var.public_subnet_cidrs
  private_subnet_cidrs = var.private_subnet_cidrs
  azs                  = var.azs
}

resource "aws_security_group" "bastion_sg" {
  name        = "bastion-sg"
  description = "Allow SSH"
  vpc_id      = module.vpc.vpc_id

  ingress {
    from_port   = 22
    to_port     = 22
    protocol    = "tcp"
    cidr_blocks = ["0.0.0.0/0"]
  }

  egress {
    from_port   = 0
    to_port     = 0
    protocol    = "-1"
    cidr_blocks = ["0.0.0.0/0"]
  }
}

resource "aws_security_group" "private_sg" {
  name   = "private-sg"
  vpc_id = module.vpc.vpc_id

  ingress {
    from_port       = 22
    to_port         = 22
    protocol        = "tcp"
    security_groups = [aws_security_group.bastion_sg.id]
  }

  egress {
    from_port   = 0
    to_port     = 0
    protocol    = "-1"
    cidr_blocks = ["0.0.0.0/0"]
  }
}
env/dev/variables.tf
variable "vpc_cidr" {}
variable "public_subnet_cidrs" {
  type = list(string)
}
variable "private_subnet_cidrs" {
  type = list(string)
}
variable "azs" {
  type = list(string)
}
env/dev/terraform.tfvars
vpc_cidr             = "172.16.0.0/16"
public_subnet_cidrs  = ["172.16.1.0/24", "172.16.2.0/24"]
private_subnet_cidrs = ["172.16.10.0/24", "172.16.11.0/24"]
azs                  = ["ap-northeast-2a", "ap-northeast-2c"]
variables.tf 차이점
| 파일 위치 | 역할 | 사용하는 곳 |
| modules/vpc/variables.tf | 모듈 내부에서 사용할 변수 정의 | 모듈 자체 (modules/vpc/main.tf 등) |
| env/dev/variables.tf | 모듈 호출 시 넘겨줄 변수 정의 | 환경별 구성 (envs/dev/main.tf 등) |
실행
cd terraform/envs/dev

terraform init       # 모듈, provider 초기화
terraform plan       # 어떤 리소스가 생성되는지 확인
terraform apply      # 실제로 리소스 생성
plan 명령어를 실행해주면 아래와 같이 어떻게 생성될 것인지 표시가 됩니다!
# module.vpc.aws_vpc.main will be created
  + resource "aws_vpc" "main" {
      + arn                                  = (known after apply)
      + cidr_block                           = "172.16.0.0/16"
      + default_network_acl_id               = (known after apply)
      + default_route_table_id               = (known after apply)
      + default_security_group_id            = (known after apply)
      + dhcp_options_id                      = (known after apply)
      + enable_dns_hostnames                 = true
      + enable_dns_support                   = true
      + enable_network_address_usage_metrics = (known after apply)
      + id                                   = (known after apply)
      + instance_tenancy                     = "default"
      + ipv6_association_id                  = (known after apply)
      + ipv6_cidr_block                      = (known after apply)
      + ipv6_cidr_block_network_border_group = (known after apply)
      + main_route_table_id                  = (known after apply)
      + owner_id                             = (known after apply)
      + tags                                 = {
          + "Name" = "test-vpc"
        }
      + tags_all                             = {
          + "Name" = "test-vpc"
        }
    }
apply 명령어 실행시 AWS에 아래와 같이 VPC가 구성됩니다!
| AZ | Public Subnet CIDR | Private Subnet CIDR |
| ap-northeast-2a (서울a) | 172.16.1.0/24 | 172.16.10.0/24 |
| ap-northeast-2c (서울c) | 172.16.2.0/24 | 172.16.11.0/24 |

+ 궁금했던 점
이미 VPC가 생성된 시점에서 terraform apply를 한번 더 실행하면 어떻게 될까?
결론은 코드가 변경되지 않았으면 아무것도 변경되지 않는다!
Terraform의 큰 장점은 상태기반의 선언형 인프라 관리 라고한다..
AWS리소스와 비교해서 차이점이 있는 경우만 변경하거나 삭제한다고 합니다 만약 CIDR 값을 변경한다면 기존 VPC를 삭제후 재생성 된다!
깃 코드 주소
https://github.com/Darren4641/TerraformVPC
GitHub - Darren4641/TerraformVPC: terraform을 이용한 VPC 생성
terraform을 이용한 VPC 생성. Contribute to Darren4641/TerraformVPC development by creating an account on GitHub.
github.com
'AWS' 카테고리의 다른 글
| AWS Load Balancer Target Failover (0) | 2025.03.27 |
|---|---|
| AWS Load Balancer Draining 상태 (0) | 2025.03.27 |
| ECR 스프링 부트 GitHub Action 설정하기 (0) | 2023.08.20 |
| AWS VPC 설정 (0) | 2023.07.10 |
| AWS - IAM이란(1) (0) | 2023.07.05 |


