전에도 스프링 부트로 게시판 작성 및 목록을 포스팅했는데요 그때 포스팅은 단순히 소스코드만 있었는데 이번 시간에는 View도 같이 작성한 소스를 설명드리겠습니다.
저희는 인텔리제이로 사용하였는데 여기서는 JSP를 사용하지 않고 mustache라는 템플릿을 사용합니다. 인텔리제이 무료 버전에서는 JSP를 사용 불가합니다. 하지만 MUSTACHE라는 템플릿은 사용 가능하며, 또한 쉬운 코드로 작성할 수 있기 때문에 머스테치로 화면을 구현해보려고 합니다!
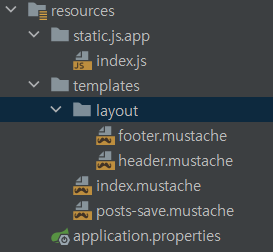
먼저 main/resources 디렉토리에 templates를 만들어준 후 index.mustache를 작성해줍니다.
{{>layout/header}}
    <h1>스프링 부트로 시작하는 웹서비스</h1>
<hr>
    <div class="col-md-12">
        <div class="row">
            <div class="col-md-6">
                <a href="/posts/save" role="button" class="btn btn-primary">글 등록</a>
            </div>
        </div>
    </div>
<hr>
<table class="table table-horizontal table-bordered">
    <thead class="thead-strong">
    <tr>
        <th>게시글번호</th>
        <th>제목</th>
        <th>작성자</th>
        <th>최종수정일</th>
    </tr>
    </thead>
    <tbody id="tbody">
    {{#posts}} <!--//post라는 List를 순회(for문)-->
        <tr>
            <td>{{id}}</td>
            <td>{{title}}</td>
            <td>{{author}}</td>
            <td>{{modifiedDate}}</td>
        </tr>
    {{/posts}}
    </tbody>
</table>


{{>layout/footer}}
보시면 {{>layout/header}} 와같은 코드들이 보이시죠? 이거는 머스테치에서 다른 파일을 불러오는 소스코드인데요 해석하자면 >는 현재 경로에서 찾는 것입니다. layout이라는 디렉터리에 header라는 파일을 부른다는 소리입니다. 그럼 layout디렉터리를 만을 어서 header와 footer를 각각 써줍니다.
header.mustache
<!DOCTYPE HTML>
<html>
<head>
    <title>스프링부트 웹서비스</title>
    <meta http-equiv="Content-Type" content="text/html; charset=UTF-8" />

    <link rel="stylesheet" href="https://stackpath.bootstrapcdn.com/bootstrap/4.3.1/css/bootstrap.min.css">
</head>
<body>
footer.mustache
<script src="https://code.jquery.com/jquery-3.3.1.min.js"></script>
<script src="https://stackpath.bootstrapcdn.com/bootstrap/4.3.1/js/bootstrap.min.js"></script>

<!--index.js 추가-->
<script src="/js/app/index.js"></script>
</body>
</html>
보시면 아시겠지만 이 포스팅은 스프링 부트와 AWS로 혼자 구현하는 웹서비스 jojodul님의 API를 이용한 코드들입니다.
출처 : https://github.com/jojoldu/freelec-springboot2-webservice
GitHub - jojoldu/freelec-springboot2-webservice
Contribute to jojoldu/freelec-springboot2-webservice development by creating an account on GitHub.
github.com
그 다음에는 게시물을 작성하는 form 태그들을 작성해줍니다.
posts-save.mustache
{{>layout/header}}

<h1>게시글 등록</h1>

<div class="col-md-12">
    <div class="col-md-4">
        <form>
            <div class="form-group">
                <label for="title">제목</label>
                <input type="text" class="form-control" id="title" placeholder="제목을 입력하세요.">
            </div>
            <div class="form-group">
                <label for="author">작성자</label>
                <input type="text" class="form-control" id="author" placeholder="작성자를 입력하세요.">
            </div>
            <div class="form-group">
                <label for="content">내용</label>
                <input type="text" class="form-control" id="content" placeholder="내용을 입력하세요.">
            </div>
        </form>
        <a href="/" role="button" class="btn btn-secondary">취소</a>
        <button type="button" class="btn btn-primary" id="btn-save">등록</button>

    </div>
</div>

{{>layout/footer}}
버튼의 기능을 구현해주기 위해 resources/static/js/app 디렉터리에 index.js를 생성해주었습니다.
index.js
var main = {
    init : function () {
        var _this = this;
        $('#btn-save').on('click', function () {
            _this.save();
        });
    },
    save : function () {
        var data = {
            title : $('#title').val(),
            author : $('#author').val(),
            content : $('#content').val()
        };
        $.ajax({
            type: 'POST',
            url : '/api/v1/posts',
            dataType : 'json',
            contentType : 'application/json; charset=utf-8',
            data : JSON.stringify(data)
        }).done(function() {
            alert('글이 등록되었습니다.');
            window.location.href = '/';
        }).fail(function (error) {
            alert(JSON.stringify(error));
        });
    }
};

main.init();
AJAX를 이용하여 동기식으로 구현하였습니다.
화면 구성은 이쯤에서 끝이납니다. 그러면 Controller부터 살펴보겠습니다.
IndexController.java
@RequiredArgsConstructor
@Controller
public class IndexController {

    private final PostsService postsService;

    @GetMapping("/")
    public String index(Model model) {
        model.addAttribute("posts", postsService.findAllDesc());

        return "index";
    }

    @GetMapping("posts/save")
    public String PostsSave() {
        return "posts-save";
    }

}
보시면 localhost:8080/으로 접근 시 index를 반환하는데요 이게 index.mustache를 찾아간다는 뜻입니다. 그럼 그 안에 model은 org.springgramework.ui.Model 라이브러리에서 제공해주는 기능인데 서버 템플릿 엔진에서 사용할 수 있는 객체를 저장할 수 있습니다. postsService.findAllDesc()에서 가지고 온 결과를 index.mustache에 전달해주는 것이죠.
addAttribute의 첫번째 인자에는 앞서 index.mustache에서 {{#posts}} <- 이름과 맞춰야합니다.
그럼 이번에는 PostsService.java를 보겠습니다.
PostsService.java
@RequiredArgsConstructor
@Service
public class PostsService {
    private final PostsRepository postsRepository;

    @Transactional
    public Long save(PostsSaveRequestDto requestDto) {
        return postsRepository.save(requestDto.toEntity()).getId();
    }

    @Transactional
    public Long update(Long id, PostsUpdateRequestDto requestDto) {
        Posts posts = postsRepository.findById(id).orElseThrow(()
                -> new IllegalArgumentException("해당 사용자가 없습니다. id="+ id));
        posts.update(requestDto.getTitle(), requestDto.getContent());

        return id;
    }

    public PostsResponseDto findById(Long id) {
        Posts entity = postsRepository.findById(id).orElseThrow(()
                -> new IllegalArgumentException("해당 사용자가 없습니다. id="+id));

        return new PostsResponseDto(entity);
    }

    @Transactional(readOnly = true)
    public List<PostsListResponseDto> findAllDesc() {
        return postsRepository.findAllDesc().stream().map(PostsListResponseDto::new).collect(Collectors.toList());
    }

}
보시면 전에 작성된 포스팅의 소스코드도 같이 존재합니다. 마지막에 findAllDesc() 메서드가 추가되었습니다. (readOnly = true)를 해주시게 되면 단순히 조회의 기능만 쓰겠다는 것입니다. 수정/삭제의 기능이 없는 경우에 보통 쓰는데 조회의 기능만을 사용하겠다 해서 조회 속도가 개선됩니다.
. map(PostsListResponseDto::new)는 Repository의 결과로 넘어온 Posts를 stream을 Map을 통하여 PostsListReponseDto를 List로 변환하는 메서드입니다.
PostsRepository.java
public interface PostsRepository extends JpaRepository<Posts, Long> {

    @Query("SELECT p FROM Posts p ORDER BY p.id DESC")
    List<Posts> findAllDesc();

}
전에 포스팅에서 Repository 인터페이스는 비어있었는데 조회를 위하여 쿼리가 추가되었습니다. @Query안에 내용을 쿼리를 수행하도록 하였습니다.
PostsListResponseDto.java
@Getter
public class PostsListResponseDto {

    private Long id;
    private String title;
    private String author;
    private LocalDateTime modifiedDate;

    public PostsListResponseDto(Posts entity) {
        this.id = entity.getId();
        this.title = entity.getTitle();
        this.author = entity.getAuthor();
        this.modifiedDate = entity.getModifiedDate();
    }
}
조회에 필요한 데이터들의 Dto를 작성해줍니다.
이렇게 하시면 게시물 작성/조회가 가능합니다.
Posts.java
@Getter
@NoArgsConstructor
@Entity   //Table과 link될 클래스임을 명시  Setter 생성 금지 다른 이름으로 정확히 명시해서 set은 가능
public class Posts extends BaseTimeEntity {

    @Id   //PK 명시
    @GeneratedValue(strategy = GenerationType.IDENTITY)  //auto_increment 명시)
    private Long id;

    @Column(length = 500, nullable = false)
    private String title;

    @Column(columnDefinition = "TEXT", nullable = false)
    private String content;

    private String author;

    @Builder
    public Posts(String title, String content, String author) {
        this.title = title;
        this.content = content;
        this.author = author;
    }

    public void update(String title, String content) {
        this.title = title;
        this.content = content;
    }

}
Application.java (내장 AWS 사용을 위한)
@SpringBootApplication
@EnableJpaAuditing //JPA Auditing 활성화
public class Application {

    public static void main(String[] args) {
        SpringApplication.run(Application.class, args);
    }
    //내장 WAS 사용

}
BaseTimeEntity.java
@Getter
@MappedSuperclass //
@EntityListeners(AuditingEntityListener.class)
public abstract class BaseTimeEntity {
@CreatedDate
private LocalDateTime createdDate;
@LastModifiedDate
private LocalDateTime modifiedDate;
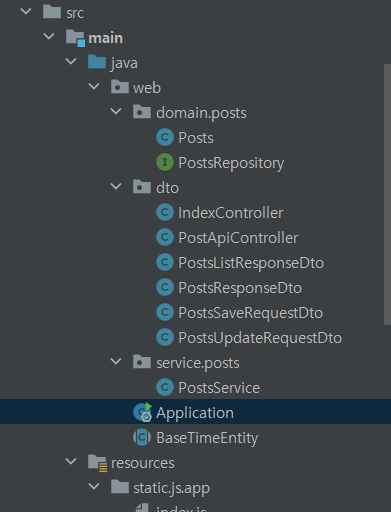
}이렇게 작성해주시면 되겠습니다. 혹시 몰라 디렉터리 구조도 올려드리겠습니다.
'스프링' 카테고리의 다른 글
| [Spring Security] + [JWT] + [RefreshToken] 스프링 시큐리티 JWT 로그인 적용기 (0) | 2022.08.18 |
|---|---|
| [Spring Security] + [JWT] 스프링 시큐리티 JWT 로그인[실습] (0) | 2022.08.12 |
| [Spring Security] + [JWT] 스프링 시큐리티 JWT 로그인[이론] (1) | 2022.08.12 |
| 스프링 부트 JPA 게시물 수정 / 변경 (0) | 2022.01.17 |
| 스프링부트 JPA 게시판 글쓰기 구현 (0) | 2022.01.07 |

